Monday, August 27, 2012

Thrift Store Frame Up-Cycle

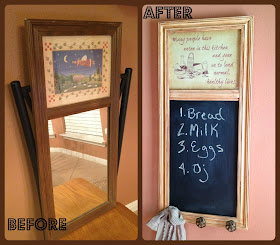
Last Saturday, the kids and I ran in to our local thrift shop, CUIC and picked up a couple of things.  We found this 2 section frame that had an 8x10 picture on the top and a larger mirror in the opening below the picture.  Since it was only $2 I told Leigh that I thought we could make something out of it for her new apartment.

Here are the before and after shots -

www.craftyincrosby.com, chalkboard, retro kitchen word art


We got it home and decided that we could lay out the Retro Kitchen Word Art sign for the top and cut out a board for the bottom and make it a chalkboard.

With the addition of 3 - $1.00 knobs from Hobby Lobby ($1.99 and then 50% off) and some cream colored paint distressed with some brown, she has a cute new chalkboard for her kitchen.


Here's the new Retro Kitchen Word Art in this format for you to download -


This was the first time that I had ever used chalkboard paint and I made a big booboo! I used a regular brush instead of a foam roller and you can see the ridges that the paint brush left behind.  So, I'm going to have to go over it again with the roller - oh well, won't be the first time I messed up a craft project!!!

All in all, I think it turned out really cute and I told Leigh that if she didn't have room for it when she moved in, that I would be happy to keep it!

Hope everyone has a great week!

Photobucket


Pin It

Saturday, August 25, 2012

Home Goods Halloween

Took the family for an outing to 2 of our favorite places - Mission Burrito and Home Goods!  Just to clarify, Mission Burrito is right in front of Home Goods and it is Ty's favorite place to eat, so if we go to Home Goods we have to go to Mission Burrito too! Go ahead, twist my arm!

To those of you that have never been to Home Goods, you don't know what you are missing! We are lucky to have one in Humble and it's only about 25 minutes from us.  Even Tim likes Home Goods.

Thought we would share some of the adorable Halloween decorations we saw there tonight -

This little guy came home with us! He's really not so little - stands about 18" tall.

Lots of Blingy Skulls! I just picked up a plain one at the Dollar Store and am 
going to head back for more so we can make our own!


 Leigh showing off her natural personality! Of course, she inherited it from me!


Leigh just read me the riot act and I've been informed that I'm not allowed to decorate for Halloween until October! Guess, I'll have to take down the Halloween wreath that I just made and put my cute Velvet Owl away! NOT!!!!!  Sorry, Leigh, but you are just going to have to live with it!! Avert your eyes!

Hope everyone is having a Super Saturday!

Photobucket

We are linking up to:    
Sunday Snaps with City Girl Gone Country


Pin It

Halloween Wreath

Yes, I know, it is only August, but it's Hobby Lobby and the Dollar Store's fault.  Really! They made me do it.........   Ok, actually, we want to have an Adult Halloween Party, so I'm trying to get a head start.

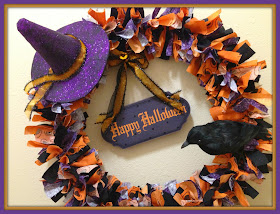
Here's my fabric strip Halloween Wreath (check out my St. Patrick's Version Here.)

fabric strip wreath, Halloween, Witch Hat, Crow

These wreaths are so quick and easy to make.  Here's what you need  -

Supplies

1. 1/3 yard of 4 fabrics - I used solid black, solid orange, orange print & purple print
2. Wire Coat Hanger
3. Decorations- hat, sign, crow
4. Misc - Glitter, Ribbon, Glue Gun

fabric strip wreath, Halloween, Witch Hat, Crow

The hat ($1.99) and sign ($3.99 plus used 40% off coupon!) came from Hobby Lobby, along with the fabrics.  I picked up the crow at the Dollar Store tonight and will be heading out in the morning to buy more!

The hat was plain black felt it needed some bling!  So I used spray glue on it, then covered it in purple glitter and added the ribbon. Much Better!

fabric strip wreath, Halloween, Witch Hat, Crow

The base of the wreath is a wire coat hanger.  Simply untwist the neck of the hanger, straighten with pliers then twist the two ends together to make the wreath.  The wreath ends up about 13" in diameter, although you could make it smaller. 

To cover the wreath, you will need 1" x 6" strips of the 4 fabrics.  I use a rotary cutter and my June Tailor Shape cut ruler.  It is a great tool to quickly cut strips of fabric for crafting or quilting.  Check out this June Tailor Video How To on YouTube to learn more about it.  I think I got mine at Hobby Lobby - with a 40% off coupon - of course!


Then plop down on the couch, in front of the TV and start tying the strips on the wreath -


Continue tying strips on the wire form until it is completely covered, pushing the strips as tightly together as possible, to make the wreath as full as you can.

Then tie on the Happy Halloween sign, glue the hat on and wire on the Dollar Store Crow and you have a cute Halloween Wreath that you can use for many years to come!


I don't know about you, but I'm starting to smell FALL in the air!  Even though it still feels like summer here in Crosby.

Hope you all have a wonderful weekend!

Photobucket


These are  few of the places that we like to party:  Brassy AppleMy Life's a TreasureSew Many WaysDebbieDoo's .  For a complete list check out our Linked Up To page.

Visit thecsiproject.com


Pin It

Tuesday, August 21, 2012

Craftgawker - Failure/Success/Failure

Ok, have any of you guys submitted to Craftgawker?  I submitted something when we first started blogging and it was REJECTED ! Boy was I bummed!


It (I) was rejected (they use Declined which is a politically correct word for REJECTED!) due to "Low lighting/and or underexposed".  So my feelings were hurt and I decided that they were just going to miss out on all of my future Fabulousness!  So there! I'll show you!

Then 100 blog posts later, I read an article about how to drive traffic to your blog and one of those ways was to post on Craftgawker.  So I thought, what the heck, I would give it another try.  So on Sunday, I submitted our Retro Kitchen Word Art post and would you believe they ACCEPTED it?  They Liked us, they really did! I could just feel the LOVE! Applause from the crowd!!!


Oh, happy day! I thought, Ok, we should do this again! So I promptly submitted our July 4th Bunting and eagerly awaited it's acceptance. 

But alas, we were REJECTED again!!!!  This time due to "Composition too tight".  Really? What the heck?


So, I really need your help. Have you submitted to Craftgawker?  Successfully? If so, do you have any tips? I think that it is worth it since we got a lot of hits from it, but is it really worth all the heartache?

I need your advice - what do you think? Craftgawker yes or Craftgawker no?

Bumbling our way through Blogland......

Photobucket


Pin It

Sunday, August 19, 2012

Bacon & Egg Muffins

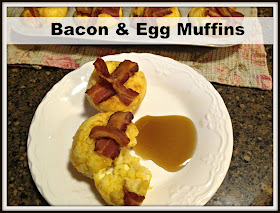
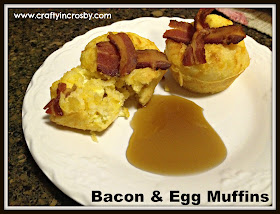
Are your Recipe Ripper?  Well I am!  I am constantly ripping out recipes from magazines to try and I've had this one on the fridge since April.  Leigh decided it was time to try it out so we made them for breakfast this morning. The recipe came from BH&G and here is a link - Bacon & Egg Muffins

www.craftyincrosby.com, recipes, breakfast, cornmeal breakfast muffins

The recipe only called for one piece of bacon on the top, but that's not enough!!!! MORE BACON!!!

We also think we will try them again with jalapeno peppers and crumbled bacon in the muffins.  Mmmm.... Bacon, really there can never be enough.

Bacon-and-Egg Muffins

Makes: 12 servings
Prep: 30 mins Bake: 400°F 15 mins to 17 mins   Cool: 5 mins

ingredients
·                  4 slices bacon, cut in thirds
·                  5 eggs
·                  Salt and ground black pepper
·                  1 cup all-purpose flour
·                  ½ cup yellow cornmeal
·                  2 tablespoons sugar
·                  2 ½ teaspoons baking powder
·                  ½ teaspoon salt
·                  1 cup milk
·                  ¼ cup vegetable oil or butter, melted
·                  ½ cup shredded cheddar cheese
·                  Maple or cane syrup (optional)

directions
1.Preheat oven to 400 degrees F. In a large skillet cook bacon just until it begins to crisp. Drain and reserve drippings. Return 2 tsp. drippings to skillet. For scrambled eggs, in a small bowl beat 3 of the eggs, 2 Tbsp. water, and a dash each of salt and pepper. Cook eggs in hot skillet over medium heat without stirring until eggs begin to set on bottom and around edges. With a large spatula, lift and fold for uncooked portion to flow underneath. Cook until set yet still moist. Transfer to bowl; set aside.

2.Brush twelve 2-1/2-inch muffin cups with some of the remaining bacon drippings. Set muffin cups aside. In a medium bowl stir together flour, cornmeal, sugar, baking powder, and 1/2 tsp. salt. In a separate bowl combine milk, oil, and remaining 2 eggs; stir into flour mixture. Fold in scrambled eggs and cheese. Spoon into muffin cups (cups will be full).

3.Place one bacon piece on each muffin. Bake 15 to 17 minutes, until light brown and a toothpick inserted in center comes out clean. Cool in cups on a wire rack for 5 minutes. To loosen muffins from pan, run a small metal spatula or table knife around edges of muffins; remove from pans. Serve warm with maple syrup.


www.craftyincrosby.com, recipes, breakfast, cornmeal breakfast muffins

These are definitely a keeper and would really impress your guests! Hey, we are all about looking good!

Enjoy your Sunday and God Bless Y'all !!

Photobucket


Pin It

Saturday, August 18, 2012
Owls Everywhere!

Last Saturday, Leigh brought home a present for me.  She knew I was having a rough time with her Dad having surgery and thought this would cheer me up.  She left it on the counter for me and when I saw it I was all alone.  Good thing, because I would have burst into tears if she had been around.  She has been a rock for us the past four weeks and I don't know what we would have done without her. From bringing clothes to the hospital, playing taxi for her brother, taking care of the animals and grocery shopping, she has pitched in without any complaints and we love her for it.

She makes me so proud!!!   Here is a picture of the adorable owl that she got at Kohls for me -


Isn't he just the cutest thing?  I can't wait to work him in to my fall decor.

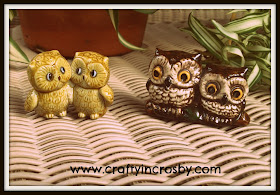
This morning, we ran up to our local thrift shop (C.U.I.C) and I found these two little beauties!  The are both about an inch tall and maybe an inch and half wide.  They are probably from the 70's or 80's and I paid 10 cents a piece for them!!

Vintage Owls


This afternoon, we took Tim out to Hobby Lobby to look around and get him out of the house.  He hasn't left the house in 3 weeks except to go to the Doctor's office or the hospital, poor thing and since it was tax free weekend, we didn't want to go to Wally World or Target.

And of course, they had OWLS EVERYWHERE!  Here are a few of our favorites - 


The last one is Leigh's favorite.  We didn't buy any owls from Hobby Lobby, but I did pick up some supplies to make a Halloween wreath.  I hope to make it tomorrow and post it on the blog.

Hope your are having a Super Saturday!

Photobucket


Pin It