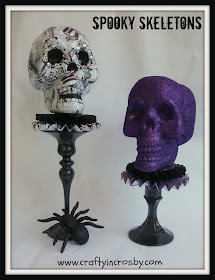
What do you think? I LOVE them and think they turned out even better than I imagined.
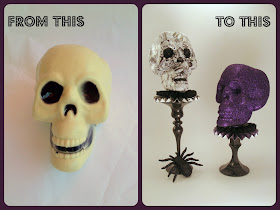
They started out like this -
And ended up like this -
They are incredibly easy to make and you probably don't need instructions, but I thought I would go ahead and put together a brief tutorial.
Supplies -
2 Dollar Store Skeleton Heads
12 x 12 Scrapbook Paper -
2 sheets black & white patterned paper, 1 sheet black cardstock,
1 sheet purple patterned paper
2 Dollar Store Glass Candlesticks
Purple Glitter
Clear Jewels (self adhesive)
Black Spray Paint
Black Craft Paint
Mod Podge
Tools -
Martha Stewart Scoring Board
Glue Gun
1 1/2" Circle Punch
Border Punch
Fine Line Black Permanent Marker
Adhesive
Paint Brushes
Instructions -
1. Paint your candlesticks and one skeleton head black. I used Rustoleum Hammered Metal in Black and I love the slight texture it gives to the candlesticks.
Black & White Head -
2. Tear one 12 x 12 Black & White patterned scrapbook paper into small pieces and Mod Podge on to skeleton head. The paper I used was really too heavy (probably cardstock) so I really had to work it down onto the head with lots of MP. I actually painted small sections of the head with MP, then painted the back of the paper with it too before laying it on the head and going over it again with MP. Let dry overnight. It will look like this -
3. Paint the eye sockets, nose and mouth with black craft paint. I used a fine line black permanent marker to outline the teeth.
4. Adhere jewels around eye sockets.
Ruffles - (this is for both skeletons
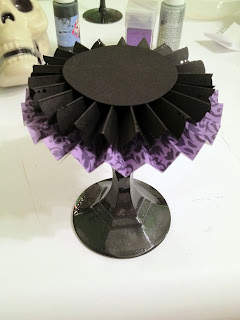
5. Cut 4 - 2 1/4 x 12 inch strips of black paper. Punch one edge of each strip with border punch.
6. Punch 8 1 1/2" circles from black cardstock.
7. Score each strip every 1/2" and fold. Join 2 pieces together with adhesive and glue black circle on top using glue gun. Check out YouTube for all kinds of videos on how to make these rosettes. I just kind of made it up as I went along and they turned out pretty good. This is the first time I've used this board and I have to say that it is an awesome tool!
8. Cut 2 - 2 1/4 x 12" strips of B&W patterned paper and 2 from the purple paper.
9. Repeat the scoring process, but skip the edge punch. Glue one circle to the bottom of the rosette and glue one circle to the top - using hot glue. Then glue one black rosette on top of each of the patterned rosettes and glue to the top of each candlestick.
Purple Glittered Head -
10. Using the black spray painted head - Cover in Mod Podge and then sprinkle (heavy) with purple glitter.
11. Then using generous Hot Glue, glue heads on the top of the rosettes.
Then sit back and enjoy your AWESOME SPOOKY SKELETON HEADS!
I would love to see any other Revamped Skeleton heads - post your pictures on our Facebook Page !
October is almost here! Time to start decorating!

These are few of the places that we like to party: Brassy Apple, My Life's a Treasure, Sew Many Ways, DebbieDoo's . For a complete list check out our Linked Up To page.

Pin It


Jeanette!!
ReplyDeleteWhat a great idea!!
They look fabulous!!
Hugs,
Debbie
Thanks so much Debbie! I just love how they turned out and they are going to look fantastic on our Halloween Party Buffet Table!
DeleteHa...those are darling! I love Halloween decorating and you have a jump start on the fun. Thanks for sharing.
ReplyDeleteThanks Debbie! I'm trying to be ahead of the curve this year!
DeleteLove it. I must give this a try!
ReplyDeleteThanks for stopping in to give us a shout out!
DeleteI love your skeleton heads, they are so cute and make the original one look so boring!! Love them so much! definitely gonna pin this to try sometime! :)
ReplyDeleteThey were really easy to make Ashley! Let me know if you make them, I would love to see yours!
DeleteWow - what a great job you did - brilliant idea!
ReplyDeleteThanks for dropping by Karima!
DeleteGreat Idea!!! I adore the glitter! An easy way to get the Day of the Dead look!
ReplyDeleteThey reminded me of Day of the Dead too and they were so cheap to make. I'm all about Halloween on the cheap!
DeleteThose are awesome! The paper mod podged on is my favorite!
ReplyDeleteI'm kind of partial to that one too! Thanks for dropping in and come back soon!
DeletePURPLE!!! Oh man, I swear, this is straight out of Corpse Bride. http://www.youtube.com/watch?v=bAPhUKTWU6E (this is a video of the skeleton dance, I bet you'll see the resemblance!)
ReplyDeleteI love crafting on a dime, and if the result ends up as classy (purple glitter skulls are classy, right?) as this, I am positively ecstatic.
Thanks so much! Loved the clip! Now I need a black fedora for them! I love the Dollar Store, especially when you can create something really cool from there.
DeleteOh, I love these! It is amazing how awesome these turned out. I love the stands, too! Wow!!! Thank you so much for sharing at A Bouquet of Talent. I am so thrilled to have you share this great project. :)
ReplyDeleteHave a wonderful week. HUGS
Thanks so much Kathy and thanks for hosting!
DeleteThe are so totally cool. I love the color. Gotta love The Dollar Store. Rhonda
ReplyDeleteI'm in trouble now because they opened up an Everything's a Dollar here in Crosby and I drive by it every day!!! Really it has become an addiction, but they have so many cool things to decorate!
DeleteThese skulls look awesome! The little stands are perfect! I love improving on dollar store decorations. Thanks for sharing your Halloween decorations with us at Gettin' Krafty!
ReplyDeleteThanks for hosting such a great party and inviting me over!
DeleteYou won't even know these started from the original, they look awesome. Love the stands, you made dollar store look high end. Thanks for sharing your inspiration with Sunday’s Best – you helped make the party a success!
ReplyDeleteThanks Cathy! So far, they are my favorite Halloween decoration.
DeleteThis looks so simple and awesome. i love the purple glitter skull! I have to try this this year. Good craft for my daughter and I to do.
ReplyDeleteThanks so much for linking up with my for my first party on Tell Me About It Thursday! Enjoy your week!!
Julie from Stlavonlady – Scatterbrained In St. Louis
You really did an AMAZING job! I want some now! :) Hopped over from I Gotta Create and I'm happy to be your newest follower. Would love to have you stop by for a visit. Blessings ~ Judy
ReplyDeleteSo glad you like them - I just love how they turned out! I hopped on over to your blog and I just love all of your beautiful furniture! I just bought my first chalk paint this past weekend and am going to try it on Saturday. I will definitely be checking out all your great pieces for inspiration! I'm a follower now too!
DeleteAdorable! I love these so much I wanna make them and keep them on display all year long! Thank you for sharing!!
ReplyDeleteBrittany Michelle
blog.thesapphirebee.com
Thanks Brittany - I wanted them to be Glamorous and not too scary. Hope you come back soon!
DeleteOh my ...those are clever and creepy!
ReplyDeleteThanks for linking up this week!
Stacey of Embracing Change
This is amazing! So fun and festive. You did a really great job. I hope you will link this up to my Wickedly Creative Halloween Ideas Party if you haven't already.
ReplyDeletehttp://www.itsybitsypaperblog.com/2012/09/2012-wickedly-creative-halloween-ideas.html
Thanks Lindy! I just linked up and am your newest follower. I love your Halloween Party!
DeleteThey look great ... way to go!
ReplyDeletehow awesome I'm totally gonna try and copy thanks for the inspiration
ReplyDeleteThey are super easy to make. I would love to see a picture if you do make some - share it on our Faceboook page - https://www.facebook.com/CraftyInCrosby Can't wait to see it!
DeleteI love them both but I am madly in love with the purple one... but it may have something to do with my love of glitter! Thanks for sharing these at our Keep Calm & Link Up party! Hope to see you again in a couple of days for the next one!
ReplyDeleteLove love dollar store revamps! You should enter your photos from this project into Craftbaby's Halloween Decor Challenge! :)
ReplyDeletehttp://www.craftbaby.com/contests/32/halloween-decor