Here are the materials you will need:
3 sheets of 12 x 12 scrapbook paper
1 piece of foamboard 12 1/2 inches long by 3 inches wide
Chipboard letters if desired
Hot glue gun
Tweezers
Stapler
Start folding paper making fold about 3/4" each. It is important that the first fold be backside of paper to backside.
Continue folding until the entire paper is folded. I didn't worry too much about the folds being exactly the same. It really doesn't matter if one is a little larger than the others. Take a look at how much larger the middle fold is than the others, but once it is complete you won't be able to tell.
Continue until the entire piece is folded.
Fold the folded strip in half and staple together from the back.
Add a small strip of glue in between the two folds that you stapled.
This joins the two edges together and keeps the light from shining through.
I notched the top of the two joined papers so that it doesn't show too much from the front.
Then glue the bottom edge to the foam board.
I also added a small bit of glue between the first folds for added stability.
This will keep the paper from folding back.
Cut 1" off the next sheet and repeat the folding process. Make sure to start the fold on the 11" side so that you will end up with an 11" long fan fold.
Staple and glue, just like the first sheet, then glue the 2nd sheet onto the foam board.
Cut 2 1/4" off the 3rd sheet and fan fold and glue as described above.
It is important to close up the bottom of the two edges on the last sheet, since this will show from the front. Drop hot glue in from the back and hold the front edges together with tweezers.
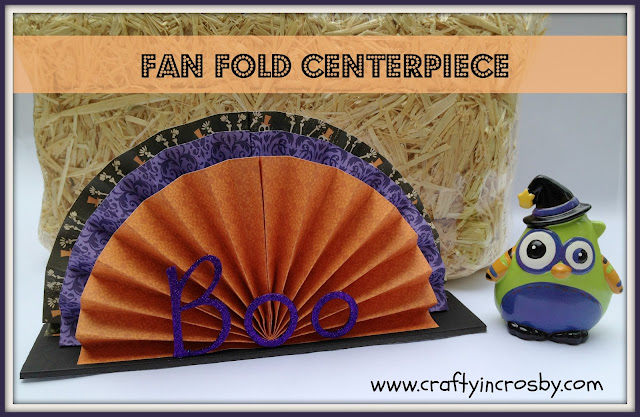
Glue that sheet down and glue the letters on to it and your Halloween Center Piece is finished!
I used chipboard letters that I painted with purple craft paint, covered in Mod Podge and then glittered.
Such a cute and easy decoration for any holiday! I can't wait for Halloween!

Pin It
These are few of the places that we like to party: Brassy Apple, My Life's a Treasure, Sew Many Ways, DebbieDoo's . For a complete list check out our Linked Up To page.


this is such a cute and simple project! thanks for sharing!
ReplyDeleteThanks for stopping by Sarina! (Your name is beautiful, by the way!)I really love how this turned out.
DeleteWhen this came up on my Google reader yesterday I was hoping you would add it to my link party. I' m so happy you made this tutorial, I loved your 4th of July one and this Halloween one is so cute. I'm will be copying this. Thanks so much for adding it.
ReplyDeleteThanks Karri! I had fun making it and it is really easy to make. Hope your readers like it too.
DeleteWhat a great idea! Love it! Thanks for linking up to our Countdown to Fall link party! Have a great night! :)
ReplyDeletehttp://dixie-n-dottie.blogspot.com/2012_09_03_archive.html
so adorable & festive! love it!!
ReplyDeleteThis is such a fun centerpiece and I can see how it would work for almost any holiday! Love your little owl too!
ReplyDeleteLynn
LOVE the boo centerpiece!!!!
ReplyDeleteThanks so much for sharing this at The DIY Dreamer.. From Dream To Reality!
Oh how cute! Thank you for sharing at our Pinteresting Party!
ReplyDeleteThis is so cute! I could probably incorporate this in a birthday decoration for our October birthdays!
ReplyDeleteThanks for sharing with my Super Link Party! :-)
This is so cute. I love that it is easy but has big impact. Thanks for sharing on Tout It Tuesday! Hope to see you tomorrow.
ReplyDeleteVery festive! Thanks so much for linking up at I Gotta Create! <3 Christina
ReplyDeleteThis is so creative and cute!! Thank you so much for sharing at Bouquet of Talent. I am so thrilled to have you. You made my first party very special. HUGS
ReplyDelete