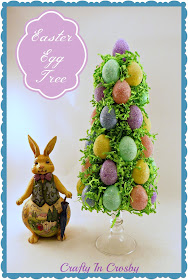
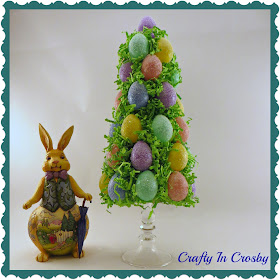
So here is last year's Easter Egg Tree Tutorial with somewhat better (?) Photos -
Since I made it out of a cone I was able to place it on a glass candlestick to raise it up. I think it adds a little bit of elegance to it and also gives it more of a presence.
You will need - Mod Podge, Glitter - I used Sullyn from Hobby Lobby and some very fine purple that I've had for ages, 2 bags of small eggs (48), 1 bag of green paper grass, poster board, and a glass candlestick.
This is the messy part - Have Fun! Paint each egg with Mod Podge, then cover in glitter. I poured small amounts of both glitters onto a paper plate and then sprinkled them on to the Mod Podge covered egg that I placed in a small bowl. Shaking the bowl to make the egg turn helps evenly cover the egg. I let mine dry overnight, but they would probably dry in an hour or so.
Then it is time to make the cone. Take a length of ribbon or string and tie one end on to a pencil. Measure 12" out and tie a knot.
Hold the knot on the corner of the paper and make a mark from one side of the poster board to the other.
Then measure 2 inches on the ribbon from the pencil and a make another line in the corner of the poster board.
Next cut out the poster board.
Roll the poster board into a cone and secure it using tape. You will want to end up with an opening instead of a point. That will allow you to position the last egg on the top of the cone. The cone will be a little off, but you can even it out with scissors.
If you are going to place the cone on a candlestick you should trace the bottom of the cone now so that you can make an insert that will allow the cone to be secured to the candlestick. Otherwise, the cone will slide down and cover the candlestick.
I traced bottom edge of the cone onto a piece of posterboard and cut out the circle. Trace a smaller circle about 1/3 of an inch inside the outer edge. Then cut tabs all the way around the circle. I used my glue runner on the tabs, then bent them up and placed this into the bottom of the cone. It should fit about an inch up into the cone and may take a few adjustments to get it right. Once I had it in and level I used the glue gun on a few of the tabs to secure it permanently.
If I had this to do over I would probably cover the cone with green paper and then add the Easter Grass, but you know what they say about hindsight!!! I used spray adhesive and then lightly covered the cone with grass. You will add more grass after gluing on the eggs to fill in the holes so don't worry about the white showing through. Of course, if you cover the cone with green paper that would solve that problem!
Using a glue gun and generous amounts of glue, start adhering the eggs.
After they are all glued on you will need to fill in the gaps with more grass. I just bunched up several strands, hit it with the glue gun and stuffed it in the holes.
I used a generous amount of hot glue to secure the candlestick inside the cone after all the eggs were glued on.
Hopefully, these pictures were a little better than last year's! I still love the tree and it held up really well - even stored in the hot attic.
I'm having a hard time with my decorating this year since Easter and St. Patrick's day are so close together. I have my St. Patrick's Day Wreath from last year on the outside of the front door and the Easter wreath on the back of it!
How about you? Are you putting out decorations for both holidays? I'm really conflicted about this one! LOL! Oh, the worries of a chronic crafter!

We're on the Fence! Won't you take a minute and vote for us?


Thanks for sharing!! What a cute project :(
ReplyDeleteI like this! I'm going to have to try this one! I have everything here already so it would be a zero cost for me!
ReplyDeleteLove this! Thanks for the tutorial! I've pinned it so I can try and get one made. I think I'll try washi taping my eggs instead of glitter. I am anti-glitter! :) Although they do look very pretty!!
ReplyDeleteI would love to see your washi tape version! Email me a picture when you get it done! Thanks for dropping in!
DeleteThis is so cute! love how glitter transforms those plastic eggs! The bunny posing with the tree is very sweet too- I wish easter wasn't so early -I have both holidays' decorations out too- I was looking for a bunny in a leprechaun costume but no luck- lol
ReplyDeletevisiting from beyond the picket fence
Cheers!
Wow! I would have never thought of using paper to share the tree. Genius! I hope you share your ideas on my party every week- http://atozebracelebrations.com/2013/03/link-party-every-tuesday.html
ReplyDeleteNancy
Thanks Nancy! I'm following you now on Bloglovin and will make sure to join the party this week!
DeleteThat is super! So cute girl!
ReplyDeleteThat is super! So cute girl!
ReplyDeleteThanks for the kind comments Rena! I'm following you now too via Bloglovin.
ReplyDeleteHope you have a wonderful St. Patrick's Day!
Really adorable!
ReplyDeleteThanks for sharing!
Stacey of Embracing Change
Your egg tree is adorable!! I love it. Great tutorial, too! Just pinned. I want to make one of these. Thank you so much for sharing at A Bouquet of Talent this week! So thrilled to have you share with us. Have a wonderful weekend!
ReplyDeleteHugs
Kathy