Friday, June 28, 2013

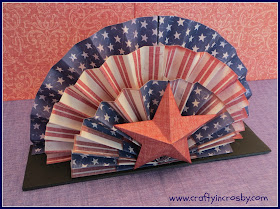
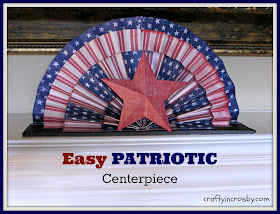
Easy Patriotic Centerpiece

Last 4th of July I decorated the mantel on the 4th - nothing like waiting till the last minute! I got the idea for this centerpiece from a wooden one that I saw at Kohls.  The minute I saw it, I knew that I could make one from paper for just pennies.

This year I added a 3D star to the front of it and it is finally complete!

paper folding, paper crafts, July Fourth, Fourth of July, Patriotic

You will need 4-12x12 sheets of scrapbook paper, 1 piece of black foamcore board 12 1/2" x 3" and a hot glue gun.

I made one of these for Halloween last year and put together a step by step tutorial that I am going to share here - just pretend that this is red/white/blue paper and that the skeletons are stars!

Start folding on sheet of 12x12 scrapbook paper making folds about 3/4" each.  It is important that the first fold be backside of paper to backside.


Continue folding until the entire paper is folded. I didn't worry too much about the folds being exactly the same.  It really doesn't matter if one is a little larger than the others. Take a look at how much larger the middle fold is than the others, but once it is complete you won't be able to tell.


Continue until the entire piece is folded.


Fold the folded strip in half and staple together from the back.


Add a small strip of glue in between the two folds that you stapled.
This joins the two edges together and keeps the light from shining through.


I notched the top of the two joined papers so that it doesn't show too much from the front.


Then glue the bottom edge to the foam board. 

 I also added a small bit of glue between the first folds for added stability. 
This will keep the paper from folding back.


Cut 1" off the next sheet and repeat the folding process.  Make sure to start the fold on the 11" side so that you will end up with an 11" long fan fold.


Staple and glue, just like the first sheet, then glue the 2nd sheet onto the foam board.

Cut 2 1/4" off the 3rd sheet and fan fold and glue as described above.

It is important to close up the bottom of the two edges on the last sheet, since this will show from the front.  Drop hot glue in from the back and hold the front edges together with tweezers.


Glue that sheet down on to the foamcore and you are almost done.

The last step is to cut out a 2 1/2" star and score on the lines as indicated below - 


I have a scoring board, but you could easily score them with a credit card or craft stick. Once all of the scores are completed you will begin to fold the star.

Hold the star wrong side up and fold all of the scored lines on the points - fold with wrong sides together.  When all points are folded, flip the star over to the right side, then bring two points together as shown below - 


Then glue a bit of wadded up paper towel into the back of the star - like this - it makes it easier to glue the star onto the front of your centerpiece. 


That's all there is too it. I know it seems like a lot of steps but you can easily 
throw this together in less than 30 minutes.

You might have to adjust the length of the papers if you have a pattern you are trying to fit - like I did on the front paper, but other than that, this tutorial should help you easily put together your own centerpiece.


paper folding, paper crafts, July Fourth, Fourth of July, Patriotic


paper folding, paper crafts, July Fourth, Fourth of July, Patriotic


It looks so good on the mantel above my cocktail napkin banner! I bet I didn't spend more than $10 on all my mantel decorations!

Hope you all have a FANTASTIC FOURTH OF JULY!! God Bless America!

Photobucket


We're on the Fence! Won't you take a minute and vote for us?

Thursday, June 27, 2013

Easy Dollar Store Candy Bouquet

Yesterday was Leigh's Dad's and my sweet Hubby's B-day and at the last minute (surprise, surprise) I decided to throw together a candy bouquet for him. It turned out so cute and he was really surprised since we are celebrating his birthday on Sunday. Wish I could claim credit for the original idea, but I saw it on Pinterest of course!

Dollar Tree, Birthday gift, Easy Gift Idea, Candy Bouquet, Gift for Him

Here are the supplies you will need - I got everything at Dollar Tree -

1.  4 boxes of candy - I used Hot tamales
2.  3 snack size packages of candy bars - they come 6 in a pack at Dollar Tree
3.  1 piece of floral foam
4.  1- 2 piece curly bow
5.  1 package craft sticks
6.  1 package chenille stems multi-color (I only used red)

Misc - glue gun, scissors and small piece of cardboard

Directions - 

1.  Cut a square of cardboard to use as a base and glue the boxes on to the square and each other - 


As you can see, I wasn't too precise on cutting the square. 
I covered the raw edge with a pipe cleaner and it looked great when it was all done.

2.  Cut the floral foam to fit into the opening so that it sits slightly below the edge of the boxes - 


3.  Cut the craft sticks in half - I used scissors and they cut just fine. I would have used skewers but they didn't have any.

4.  Lift the flap on the back of a candy bar and using hot glue, secure a 1/2 craft stick under the flap - 


Glue craft sticks to the back of all the candy bars - Make sure that all the 
Candy Bar names are going the same way!


5.  Stick the candy bars into the floral foam to form the bouquet.

6.  Curl the chenille stems around a pencil to form the curly stems and stick them into the floral foam.

7.  And last but not least - I stuck the 2 curly bows down in between the candy bars and pulled the ends out to fill in the gaps between the bars.


Dollar Tree, Birthday gift, Easy Gift Idea, Candy Bouquet, Gift for Him

Dollar Tree, Birthday gift, Easy Gift Idea, Candy Bouquet, Gift for Him

So cute and quick! Plus you could make these for any occasion and it only took about 30 minutes and $11.  I've seen these with full size candy bars for upwards of $30 in the floral section of the grocery store.

Hope you all are having an amazing week! Don't know about you, but I sure am looking forward to have the 4th off! We plan to be incredibly lazy and stay home all day which sounds like paradise to me!
Photobucket


We're on the Fence! Won't you take a minute and vote for us?
Tuesday, June 25, 2013

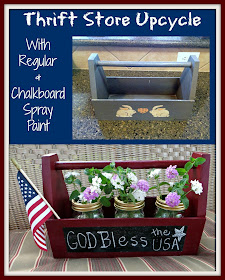
Updated Thrift Store Toolbox

I am so thrilled with my little wooden tool box re-do!! I picked it up last year at our local thrift store for just $2 !!! Of course, the blue paint and bunnies were showing their 80's age, so I gave it new life with several coats of spray paint and a spray painted chalkboard.

What a change!

thrift store, spray paint, upcycle, wood tool box

And best of all, I can use it for any holiday by simply changing out the message.  It will be beautiful at Christmas, but I can also use it for all the other holidays.

thrift store, spray paint, upcycle, wood tool box


It looks really nice on our slate hearth -

thrift store, spray paint, upcycle, wood tool box

Now I just have to work on my chalkboard lettering skills!


Photobucket


We're on the Fence! Won't you take a minute and vote for us?

Sunday, June 23, 2013

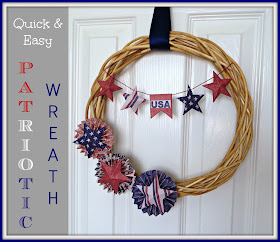
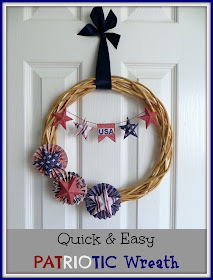
Quick and Easy Patriotic Wreath

 Several months back (ok many, many months back) I picked up this wicker wreath from Dollar Tree.  I had no idea what I would do with it and it was stuffed in the filing cabinet in the craft room.  I ran across it today when I was gathering up all the July 4th mantel decorations and decided to give it a dose of the the Red, White & Blue!

Dollar Tree, July 4th, Fourth of July, Paper Crafts, Stars, USA

Here are the supplies you will need:

1. Wreath 
2. Patriotic Scrapbook paper
3. Ink pad to ink the edges of the stars
4. Glue Gun
5. Embroidery floss & needle
6. Ribbon for hanging

I cut the stars with my Cricut, but you could also cut them by hand.  You will need 3-2 1/2" stars and 4 - 2" stars.

After cutting your stars, you will need to score folding lines as illustrated in the photo below - 

Paper Crafting, Scoring Board

I have a scoring board, but you could easily score them with a credit card or craft stick. Once all of the scores are completed you will begin to fold the star.

Hold the star wrong side up and fold all of the scored lines on the points - fold with wrong sides together.  When all points are folded, flip the star over to the right side, then bring two points together as shown below - 


Then you will end up with 3D Stars! So easy and they really look nice!

The medallions are 2 - 1 1/2" strips of paper scored every 1/2 inch. After scoring both pieces, glue the ends together and then glue a small punched circle to the back to stabilize the medallion. 

If you have never made these types of medallions/starbursts/rosettes you can watch the great Video Tutorial on how to make them.

Make 3 medallions - Red, White & Blue

To attach the 2 1/2" stars on to the medallions hot glue a bit of  wadded up paper towel into the back of the star, then hot glue on to the medallion. This will stabilize the stars without lots of hot glue showing.


Once you have completed the 3 medallion/star combos, you will need to string 4 - 2" stars on to 3 strands of embroidery floss. I also attached a small flag with USA on it that was cut from a piece of scrapbook paper.

Attach the banner to your wreath and add a bit of ribbon to hang it from.  
That's it! Quick & Easy - two of my favorite words!

Dollar Tree, July 4th, Fourth of July, Paper Crafts, Stars, USA

Dollar Tree, July 4th, Fourth of July, Paper Crafts, Stars, USA

Such a cute wreath for very little money and just perfect for a quick Sunday afternoon craft!

Wishing everyone a wonderful week!

Photobucket


We're on the Fence! Won't you take a minute and vote for us?

Wednesday, June 19, 2013

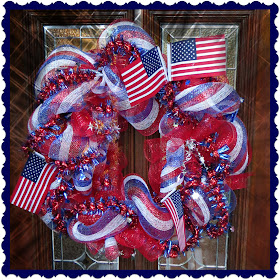
Patriotic Deco Mesh Wreath

Ok, I think this is a record for me!!! 2 weeks until July 4th and I've made a new wreath for the front door! Now, if I can only get the mantel decorated in the next couple of days I will really be on top of it!

Wal-Mart has started carrying Deco Mesh type ribbon for only $5 a spool.  I bought one 10" red and one 6" red/white/blue, along with 2 lengths of patriotic tinsel from Dollar Tree and a package of small flags from Hobby Lobby.  The wreath form also came from Wal-Mart.

Three Cheers for the Red, White & Blue!
July 4th, July Fourth, 4th of July, Memorial Day, Deco Mesh Wreath


Added sparkles with PicMonkey

July 4th, July Fourth, 4th of July, Memorial Day, Deco Mesh Wreath


July 4th, July Fourth, 4th of July, Memorial Day, Deco Mesh Wreath


I love how sparkly and bright it is and it really looks great on our wood door. Have you ever worked with this kind of ribbon before? It is a very quick and easy process and gives such a glamorous look to your front door.

We are halfway through the week!! Can't wait till Friday - how about you?
Photobucket


We're on the Fence! Won't you take a minute and vote for us?

Saturday, June 15, 2013

Last Minute Father's Day or Birthday Gift

All week long I've been planning to make a Father's Day Gift for my father-in-law and just finally got it put together.  I was originally going to use my Cricut to cut the letters out of vinyl but I couldn't get it them to fit on the jar.  So I just threw this together in PicMonkey.  What do you think?

Father's Day, Grandpa, Mustache, Printable

Father's Day, Grandpa, Mustache, Printable

The jar is a 2 quart cracker jar from Walmart and I printed the labels out on beige textured paper in wallet size so that they would fit into the squares on the jar.  As a finishing touch I tied twine around the top with a small brown button on the knot. We really love how it turned out and hope that he will too!

Here are the printables for you to use for Dad or Grandpa - 

Father's Day, Grandpa, Mustache, Printable

Father's Day, Grandpa, Mustache, Printable

Father's Day, Grandpa, Mustache, Printable

Father's Day, Grandpa, Mustache, Printable

After posting this I realized that these would also make great birthday gifts for Grandpa or Dad so I added these printables for you -


If you need an easy gift for Dad or Grandpa then this is the gift to make.

Hope you all have a wonderful Father's Day with your family!
Photobucket


We're on the Fence! Won't you take a minute and vote for us?