Friday, July 19, 2013

Wedding Photo Frames

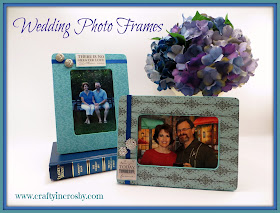
My brother-in-law and Leigh's Uncle is getting married this weekend to a really sweet lady and we are very excited and happy for both of them.  I kind of volunteered us to help with the table settings and when they said they needed picture frames, I knew we could whip them up with no problem.  We made these Scrapbook Paper Covered Frames earlier in the year and thought they would be perfect. Plus, we could easily match their colors.  This is a second wedding for both and we thought we would keep the frames very simple and streamlined - without the usually frou-frou (don't think that is a real word, but you know what I mean!) over the top wedding decorations.

weddding photos, tablescape, paper crafting
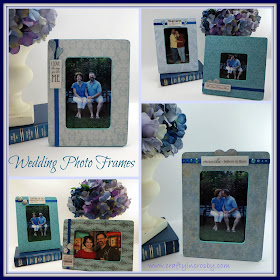
 Here are two that we made earlier in the year along with a picture 
of the $1 bare wood frames from Michaels- 


They are such a cute couple and so much in love.

scrapbook paper, photo frames, bare wood frames

The frames are really adorable and we made 16 of them for the tables.  Thank heavens Leigh came over and helped with everything. There's no way I could have made them on my own!

Paul & Angela asked that gifts be a cross of some type,  since they are combining two households and have just about everything they need.  I found this shadow box cross from The Paper Studio at Hobby Lobby and simply filled it in with leftover paper and other assorted embellishments.  I thought it would be a great keepsake for them.  I sure hope they like it! Took the cross pictures with my Iphone, so I apologize for the quality!!

The Paper Studio, scrapbook paper, embellishments, wedding

You guys be thinking about us this Saturday evening.  This is an outdoor wedding in Ft. Worth, Texas in the middle of July!  Hoping I don't melt! Wishing you all a wonderful cool weekend!


Photobucket


We're on the Fence! Won't you take a minute and vote for us?

Thursday, July 11, 2013

Easy Pallet Sign and Above Ground Pool Camouflage

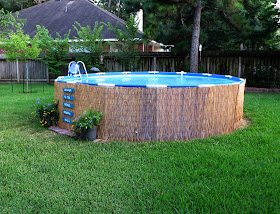
Last summer we made a family decision to buy an above ground pool.  I don't know why in the world we never did this before! We have had the best time with it and for only $250, I figure that if we can get 3 summers out of it, then we will definitely have gotten our money out of it.

I saw a great idea on Pinterest to use reed fencing around it and decided to try it.  2 rolls and $50 later we have a dressed up pool that we fondly refer to as "The Redneck Swimming Hole".


Above Ground Pool, Pallet Sign, Redneck Swimming Hole, Crosby TX
 I really enjoy seeing the pool in the backyard now.  It's not just a big blue blob and blends in with the landscaping a little more.

Above Ground Pool, Pallet Sign, Redneck Swimming Hole, Crosby TX

We got the reed fencing at Lowe's for $25 a roll -  


I measured the side of the pool, marked the fencing with a sharpie and cut it easily with our shears. You could use a heavy duty pair of scissors or even a box cutter for this too.  It cut very easily.


Then I simply tied it on to the pool supports with twine!

After cutting the fencing to fit, we had a left over piece that wasn't tall enough to cover the side of the pool.  So I just cut it in half, and then wired it together to cover the last bit on the back side.  You can't really see it there, but I know that it is covered and that you can't tell that it is patched together.

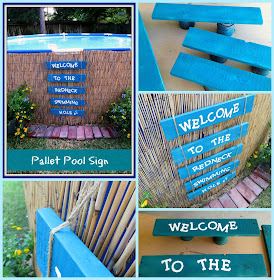
I've also been dying to make a pallet sign so we made a welcome sign for the pool.  Mr. Crafty was nice enough to cut a pallet apart for me to use.

Above Ground Pool, Pallet Sign, Redneck Swimming Hole, Crosby TX

Making the sign was really easy - 

1.  Cut out your stencils - I cut mine on my Cricut, but you could also purchase stencils.
2.  Determine the length your boards will need to be and cut the boards.
3.  Paint your boards - I used spray paint
4.  Paint the words using your stencil.  I found it easiest to use a small brush and actually paint the letters in instead of dabbing the paint on.  The pallet wood is just to uneven and I got tired of touching it up.
5.  Then I used twine 2 lengths of twine for each side and tied the boards together.

That's all there is to it! I finished this one in one afternoon.  The hardest part was deciding on the font to use!

Above Ground Pool, Pallet Sign, Redneck Swimming Hole, Crosby TX


Above Ground Pool, Pallet Sign, Redneck Swimming Hole, Crosby TX

I hope no one takes offense to my Redneck sign! But hey, down here in Crosby we are proud of our roots! And it just makes me smile every time I look out in the yard.

I've been on a business trip out of town for the past three days and I sure am looking forward to taking a dip in the Redneck Swimming Hole this weekend!

Photobucket


We're on the Fence! Won't you take a minute and vote for us?

Sunday, July 7, 2013

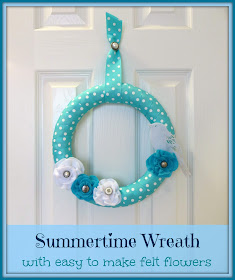
Summertime Wreath with felt flowers

Have you ever had what you thought was a great idea only to have it turn out like something you wouldn't wish on your worst enemy? Well, this wreath started out like that - it even made Leigh wince with pain. So I took everything off it except the ribbon and started all over.  Much better this time around - don't you think?

Felt flowers, polka dots, easy summer wreath, diy wreath

It was very easy to put together - at least the 2nd time around!

Here's what you will need -

Styrofoam wreath form
2 spools ribbon
1 sheet white felt
1 sheet aqua felt
felt bird from Michael's (you could use a paper die cut too)
silver buttons
glue gun
needle & thread


1.  Cover the wreath with ribbon using the glue gun to attach the ribbon.  Also cut a length for hanging.

2.  For each flower cut one 5-6" circle - I just drew a circle onto the felt with a pen. Then cut out your flower free hand like this - 


Don't worry about being exact, I just made wavy cuts until I got to the center.

2.  Roll up the center and secure with needle and thread - 


3.  Then stitch a gathering stitch on the edge of the felt for the next inch - like so -


4.  Pull the gather and secure to the center of the flower.  Continue going around the circle until you have a flower the size you want.

Don't worry about what the back looks like - See how bad mine looked???


Awful!!! 

5.  Cut a small circle - mine were 1" and hot glue to the back of the flower.  Hot glue a button into the center and you are done!

Felt flowers, polka dots, easy summer wreath, diy wreath

I made 2 white and 2 aqua flowers for our wreath.  With the addition of the felt bird, it is complete!

Felt flowers, polka dots, easy summer wreath, diy wreath

Simple and sweet, and perfect for Summertime!!  


Wednesday, July 3, 2013

Happy Fourth of July!

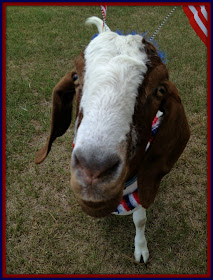
We love July 4th - Don't you?  It is absolutely Gus the Goat's favorite holiday!

Gus the Goat, Fourth of July, July 4th, Independence Day

Gus the Goat, Fourth of July, July 4th, Independence Day

Gus the Goat, Fourth of July, July 4th, Independence Day


Wishing you all a wonderful July 4th!

You have to love a nation that celebrates its independence every July 4, not with a parade of guns, tanks, and soldiers who file by the White House in a show of strength and muscle, but with family picnics where kids throw Frisbees, the potato salad gets iffy, and the flies die from happiness.  You may think you have overeaten, but it is patriotism.  ~Erma Bombeck

Photobucket


We're on the Fence! Won't you take a minute and vote for us?