Sunday, March 23, 2014

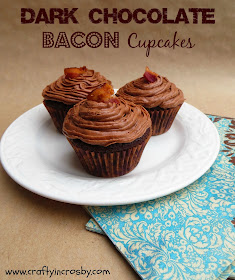
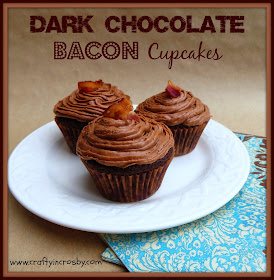
Dark Chocolate Bacon Cupcakes with The Best and Easiest Chocolate Frosting

Sounds crazy right? Dark Chocolate and Bacon? It is interesting, that's for sure.  We found this recipe on Allrecipes.com. And while I think that the cupcakes would be just as good without the bacon, Dark Chocolate Bacon Cupcakes certainly has a cool factor. Tim and Leigh both said that you couldn't taste the bacon, so I will probably make them without next time.  I think that it is the strong coffee and large amount of cocoa that makes these cupcakes so delicious.

Leigh liked the cupcakes, but said the frosting was the BOMB! That recipe came from Lauren's Latest via Pinterest.  I have to say, that it is probably the best chocolate confectioners sugar frosting that I have ever had.  I usually just dump ingredients into the bowl willy nilly when I'm making powdered sugar frosting, but now that we've tried Lauren's, it is going into the our recipe book. It is the perfect amount of cocoa and powdered sugar, and turns out very light and fluffy.


Allrecipes.com, Crafty In Crosby, recipes, cupcakes, Lauren's Latest


Dark Chocolate Bacon Cupcakes
INGREDIENTS:
12 slices bacon
2 cups all-purpose flour
3/4 cup unsweetened cocoa powder
2 cups white sugar
2 teaspoons baking soda
1 teaspoon baking powder
1/2 teaspoon sea salt
2 eggs
1 cup cold, strong, brewed coffee
1 cup buttermilk
1/2 cup vegetable oil
1 tablespoon unsweetened cocoa
powder, for dusting
DIRECTIONS:
1.Preheat oven to 375 degrees F (190 degrees C). Place bacon in a large, deep skillet. Cook over medium-high heat until evenly brown. Drain, crumble and set aside.
2.In a large bowl, stir together the flour, 3/4 cup cocoa powder, sugar, baking soda, baking powder and salt. Make a well in the center and pour in the eggs, coffee, buttermilk and oil. Stir just until blended. Mix in 3/4 of the bacon, reserving the rest for garnish. Spoon the batter into the prepared cups, dividing evenly.
3.Bake in the preheated oven until the tops spring back when lightly pressed, 20 to 25 minutes. Cool in the pan set over a wire rack. When cool, arrange the cupcakes on a serving platter. Frost with your favorite chocolate frosting and sprinkle reserved bacon crumbles on top. Dust with additional cocoa powder.

Allrecipes.com, Crafty In Crosby, recipes, cupcakes, Lauren's Latest


Here is Lauren's easy and delicious frosting recipe:

The Best & Easiest Chocolate Frosting

yield: WILL FROST 1-9 INCH ROUND LAYER CAKE OR 24 CUPCAKES

INGREDIENTS:

1 cup softened butter
1/2 cup cocoa powder, sifted
5 cups powdered sugar
1 teaspoon vanilla
3-4 tablespoons milk

DIRECTIONS:

Whip butter and cocoa together until smooth in large bowl. Stir in vanilla and powdered sugar. Slowly stream in milk until frosting reaches desired consistency. Scrape sides and whip again until light, fluffy and smooth, 1-2 minutes. Frosts 1-9 or 8 inch round layered cake or 24 cupcakes.

We are going to take the cupcakes to the office tomorrow to see what everyone thinks.  I'm sure we will have a few that will refuse, just because the thought of Bacon in a cupcake is so weird.

Hope everyone had a fantastic weekend and that Spring has come to your neck of the woods!

Photobucket


We're on the Fence! Won't you take a minute and vote for us?

Sunday, March 16, 2014

Lucky Shamrock Cake for the Birthday Boy!

Ty's birthday is March 17th and we usually celebrate it with a St. Patrick's theme. We celebrated today and I whipped up a quick Shamrock cake for the celebration.


 It was just a box cake mix (tinted green) with cream cheese coconut frosting.   To decorate, we used a Dollar Tree foam shamrock as a stencil mask and spooned green sugar crystals around it.  Remove the shamrock and you are left with a white shamrock surrounded by a field of green.  
Super quick and easy!


Ty enjoyed blowing out the candles and celebrating with the family.


Hard to believe that my sweet boy is 30 years old! We are so blessed to have such a wonderful son that brings so much joy to everyone he meets! He always has a smile on his face and laughter in his eyes.

Hope everyone has a wonderful and Happy ST. Patrick's Day! Wishing luck and joy to all of you!

Photobucket


We're on the Fence! Won't you take a minute and vote for us?
Monday, March 10, 2014

Black Eyed Peas and Cornmeal Dumplings

Since Leigh has moved back home, we have been cooking up a storm and life is good!  We checked out the Cooking Light Annual Recipes 2014 from the library a few weeks back and have an amazing down home cooking recipe to share from it!


Black Eyed Peas & Cornmeal Dumplings


Ingredients

  2 slices hickory-smoked bacon 
1 cup chopped onion 
     1 tablespoon minced garlic
3 cups unsalted chicken stock (such as Swanson)
1 1/2 cups water
1/2 teaspoon kosher salt
1/2 teaspoon freshly ground black pepper
1 (16-ounce) bag frozen black-eyed peas (about 2 3/4 cups)
3.4 ounces all-purpose flour (about 3/4 cup) 
1/3 cup finely chopped green onions 
1/4 cup yellow cornmeal
1/4 teaspoon baking soda
2 tablespoons chilled butter, cut into pieces
1/2 cup buttermilk
Hot sauce (optional)

Preparation

Cook bacon in a Dutch oven over medium heat until crisp. Remove bacon from pan; finely chop. Remove 1 tablespoon drippings from pan; set aside. Increase heat to medium-high. Add 1 cup onion to remaining drippings in pan; sauté 3 minutes, stirring occasionally. Add garlic; sauté 1 minute, stirring constantly. Add stock, 1 1/2 cups water, salt, pepper, and peas to pan; bring to a boil. Partially cover, reduce heat, and simmer 35 minutes or until peas are tender, stirring occasionally.

Weigh or lightly spoon flour into a dry measuring cup; level with a knife. Combine flour, green onions, cornmeal, and baking soda, stirring with a whisk. Cut butter into flour mixture with a pastry blender or 2 knives until mixture resembles coarse meal. Add bacon, reserved 1 tablespoon drippings, and buttermilk; stir until a moist dough forms.

With moist hands, gently divide mixture into 12 equal portions. Drop dumplings, 1 at a time, into pan; cover and cook 8 minutes or until dumplings are done, stirring occasionally. Serve with hot sauce, if desired.

Cooking Light, Recipes, Down Home Cooking


This has quickly become a family favorite and has been added to our permanent recipe file.  Even Leigh's Dad, who is a super picky eater, loves it! It is great by itself or cook up some link sausage to add a little protein to it.

How about you? Found any good recipes lately? We would love to see them - leave us a link in the comments.

Wishing everyone a lovely and warm spring break!

Photobucket

We're on the Fence! Won't you take a minute and vote for us?
Sunday, March 2, 2014

St. Patrick's Day Banner and Mantel

I have to say that I am the worst photographer ever! The light in my living room is just the worst for getting good photos, it is just too dim and the transom windows make the worst glare ever!!! One of these days I'm going to invest in some good soft lights, but until then, I guess I'll just keep trying!

This St. Patrick's day is also my sweet son's (and Leigh's brother's) 30th birthday! So we decided to decorate the mantel in his honor...and just 'cause we like decorating. 


Here are the supplies you need for the banner -

  1. 3-12x12 sheets of dark green cardstock
  2. 7 book pages
  3. Green ink to highlight the edges of the book pages
  4. 1-12x12 sheet of lighter green cardstock
  5. 1-12x12 sheet of glitter green cardstock (got mine at Wal-Mart)
  6. Green striped paper straws
  7. White cotton cord
Very quick to make - 
  1. Freehand the banner shape on the dark green cardstock.  I needed 7 to fit my mantel.
  2. Cut the book pages slightly smaller than the dark green shapes.
  3. Highlight the edges of the book pages with green ink and adhere to the dark green shape.
  4. Cut or punch 3 light green hearts and 3 glitter green hearts for each banner section. Cut 4 for the Lucky Four Leaf Clover in the middle of the banner.
  5. Crease each heart down the middle and affix to the banner sections.  Glue the glitter heart to the lighter heart then adhere to the banner. I used my hot glue gun for the hearts.
  6. Cut the paper straws in sections slightly smaller than the book page and glue to the page with hot glue.
  7. String your banner pieces on to the white yarn and you are done!


I think we are ready for St. Patrick's day now. How about you? Are you decorating for the holiday? I would love to see your decorations, so please leave me a link.

Wishing you all a wonderful and warm first week of March!

Photobucket


We're on the Fence! Won't you take a minute and vote for us?