Thursday, August 28, 2014

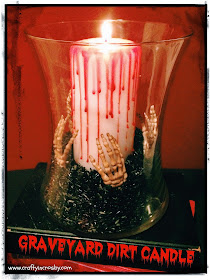
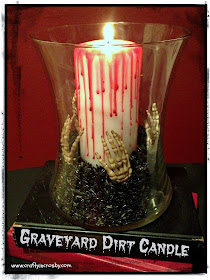
Creepy Graveyard Dirt Candle

We are officially in Halloween mode here at Crafty In Crosby and just finished our first Halloween decoration for 2014! Woohoo!

Our Creepy Graveyard Dirt Candle (Leigh came up with the name - I wanted Graveyard Dust, but we all know who's boss over here! LOL!!) started with a bag of  little skeleton hands that cost $1.99 at Michaels.

Halloween candle, Halloween DIY, Halloween decorations, skeleton hands,

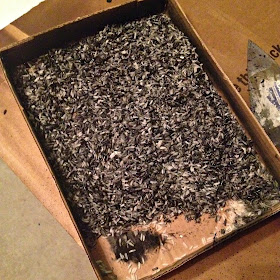
Leigh came up with the idea and suggested we use dirt for the filler. I was afraid that we might end up with all kinds of creepy crawlies in the house and thought that painted rice might work.  It is hard to see in the picture but it looks so gross....almost like nasty little maggots.  I'm really grossed out typing this because they are just the most disgusting little things! Yuck!!!!

Halloween candle, Halloween DIY, Halloween decorations, skeleton hands,

I used matt black spray paint on the rice and it really turned out great.  Took about 3 coats of paint to turn the rice dark enough. Stir the rice thoroughly between coats. I was impatient and didn't really let it dry, just stirred it and sprayed it again.


spray painted rice, colored rice, vase filler

The candle was just an inexpensive white pillar candle from Wally World with red candle wax dripped down the sides to create the blood.  It wasn't quite tall enough for my liking so I placed it on an upside down plastic container inside the glass. This raised it up and gave it the height I wanted, plus it took up room so not as much of the rice was needed.

Halloween candle, Halloween DIY, Halloween decorations, skeleton hands,

Then we spooned the rice in and placed the creepy little skeleton hands down around the candle.

Halloween candle, Halloween DIY, Halloween decorations, skeleton hands,

Halloween candle, Halloween DIY, Halloween decorations, skeleton hands,

I love how creepy it turned out and it is going to be perfect on the dessert table at this year's party! Last year we went with black and silver on the table and I think it could do with a bit of blood to liven it up!

Are you planning lots of creepy crafts for your Halloween decor this year? We would love to see them - leave us comment and we'll be sure to visit.
Photobucket


We're on the Fence! Won't you take a minute and vote for us?

Sunday, August 24, 2014

2014 Halloween Pinterest Picks

While most of you have been eagerly planning and awaiting the start of school, Leigh and I have started our 2014 Halloween Party plans.  This year, we've decided to go a bit darker and spookier with some of our decorations.

Halloween diy, Halloween tutorials, easy Halloween crafts, Halloween treats


Some of these pins have been on our Pinterest board for a while, but many of them are new.  We have great plans to recreate most of these for our annual Halloween Party, hopefully we won't run out of time.

I found this great free Iphone countdown app by to help me keep track of the days and we only have 67 left!!!


The first thing on our list is this creepy monster mud grim reaper.  The tutorial can be found on Halloween Forum.  It looks fairly easy and Mr. Crosby has committed to helping us make it! He will be so awesome greeting our guests at the front door. 


This Witchy Window Silhouette by Dave Lowe will be the perfect addition to the front of our house.


Last year we made Dave's Zombies for 2 of the windows on the ground floor.  The witch will go in the window above them.


No Halloween party would be complete without some creepy confections and these Oreo Cookie Eyeballs look incredibly easy!


Less creepy, but everyone's favorite treat are these Candy Corn Rice Krispie Treats.


Tim Burton is pretty much the King of Halloween and we are going to make our very own spooky scarecrow modeled after his creation.


We found a great tutorial on making a Creepy Pumpkin Head for our scarecrow.


Another creepy treat for the dessert table will be Rat Plague Brownie Bites. Aren't they adorable but really yucky too?


I think they will look great crawling all over these Easy Pumpkin Pretzels.


Mr. Crosby's office is going to be turned in to a spooky witch's lair and these DIY Spider Lanterns will look great on his bookshelves.


Along with a few Creepy Candles.


No spooky Halloween house would be complete without a Huge Halloween Spider.


And last but not least, we have several pallets that we are going to use to make some of these - 


With 67 days left until Halloween, I'm hoping that we can get all of these creepy props made.  Of course it is just 60 days until our party! Every year, my to do list seems to get longer and longer....... But hey, it is our favorite Holiday!

You can see all of our Halloween pins on our boards - 


Do you have a Halloween To Do List? I really hope we aren't the only Halloween Freaks out there!!! We would love to know what you have planned.  Let us know in the comments below and leave a link to your favorite pin!

Wishing everyone a wonderful last week of August!

Photobucket


We're on the Fence! Won't you take a minute and vote for us?
Wednesday, August 13, 2014

Chalkboard Labels from Dollar Tree

By now, I'm sure you have seen tutorials on how to make your own chalkboard labels or how to paint chalkboard labels on containers. But, I've got them beat! Chalkboard labels from Dollar Tree!! Already made and 16 in a package for a buck - HOLY COW! That's my kind of crafting supply - cheap and lazy - that's how we roll.

We used a border punch, and as you can see, it isn't exactly even, but still looks good as far as I'm concerned. The label was primed with regular chalk first (cover the label with chalk using the side of the chalk, and wipe it all off), then we used chalk markers from GroopDealz for the actual printing.

 Here's the package that we found on the school supply aisle at Dollar Tree -


I love the labels our our cheapie containers.  Make's them look a little more upscale and they fit right in with my current Chalkboard Obsession.  

Check out my Chalkboard Obsession Pinterest Board for lots of other cute ideas! Just click on the picture below to go right to the board.


Photobucket


We're on the Fence! Won't you take a minute and vote for us?

Monday, August 4, 2014

Bridal Shower Favors - Mix it With Love

I don't know that we could have pulled together Christine and Josh's shower without all of the wonderful ideas we found on Pinterest! Including these awesome wooden spoon favors by Something Turquoise.

We followed their step by step tutorial - Find It Here and added a custom tag for the soon 2 be Mr. & Mrs. Wilkinson. Ours are in pink and yellow (the brides favorite colors) but you can make them in any color. All of our spoons came from Michaels Arts & Crafts and were .99 each.  I was lucky enough to purchase them when they had a 25% off your entire purchase coupon.

glittered spoon, bridal shower favors, diy bridal shower, weddding shower diy favors,


glittered spoons, bridal shower favors, diy bridal shower, weddding shower diy favors,


I have to say that the tag was my favorite part of this project! We've provided a template for you to customize for your own favorite couple.  Just save it to your computer, upload it to PicMonkey, add the lucky couples name and you have your own custom tag to use for any wedding favors.

glittered spoon, bridal shower favors, diy bridal shower, weddding shower diy favors, wedding favor tag, printable, mixing bowl tag
  

We also added the date of the wedding to our tag, cut it out with a 2" circle punch, inked the edges, punched a small hole in the top and tied it on with white cotton yarn.

glittered spoon, bridal shower favors, diy bridal shower, weddding shower diy favors,

According to the tutorial, you should be able to wash and use these spoons without loosing any glitter. I'm not sure if I would use them to actually cook with, but they sure look cute in my countertop utensil holder.

glittered spoon, bridal shower favors, diy bridal shower, weddding shower diy favors,

Such a quick and easy bridal shower for your bride to be! Wishing you all a wonderful week!


Photobucket


We're on the Fence! Won't you take a minute and vote for us?